
The Beginner’s Guide to DIY Pastel Easter Nail Art
21/01/2025 · Updated on: 13/02/2025

Easter is the perfect time to celebrate the arrival of spring with soft pastel colors and cheerful designs. A simple yet eye-catching way to embrace the holiday spirit is by creating pastel Easter nail art.
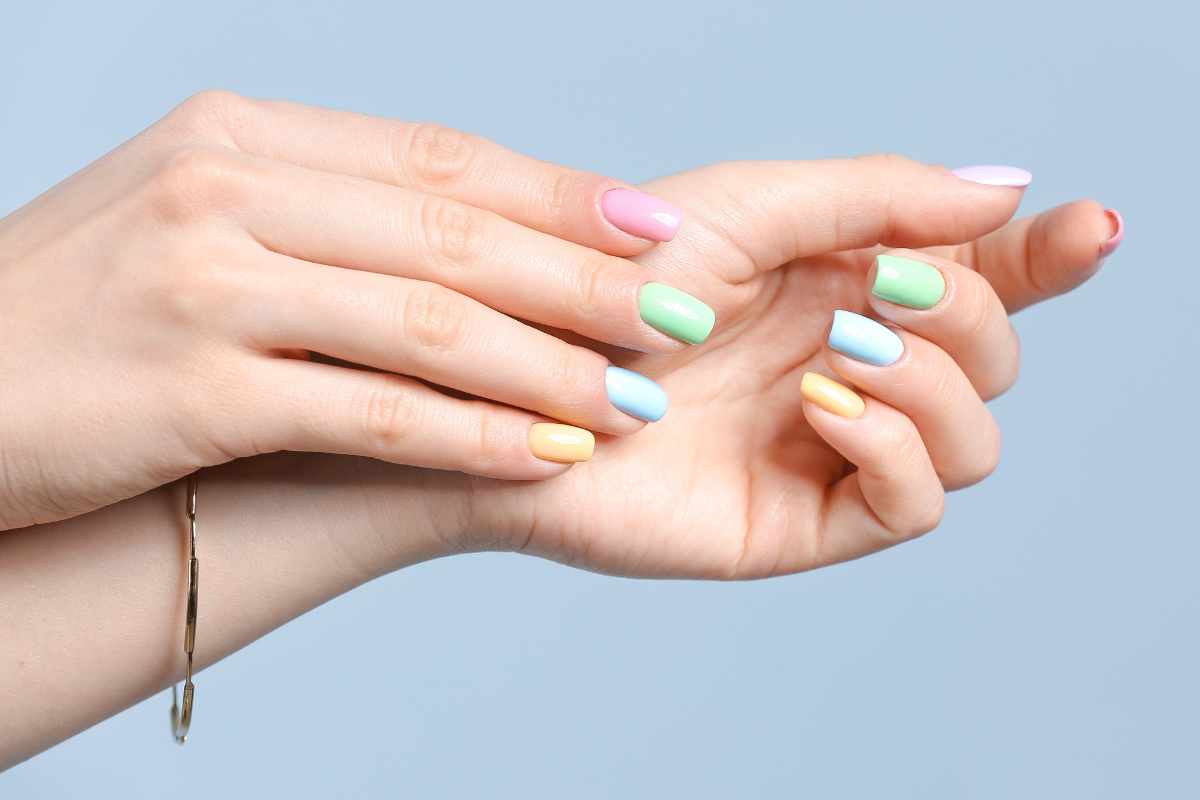
This design combines delicate shades of pink, blue, green, yellow, and purple, offering a fresh and playful look that’s perfect for beginners.
If you’re new to DIY nail art, don’t worry! This guide will walk you through creating these beautiful pastel nails step by step, ensuring a flawless and festive manicure that you can show off during Easter gatherings.
Why Pastel Easter Nails Are Perfect for Spring
Pastel nails are a timeless choice for spring, and their soft, muted tones perfectly match the season's blossoming flowers and sunny skies.
These colors are not only versatile but also incredibly easy to mix and match, making them ideal for beginners looking to experiment with nail art.
This specific pastel Easter design is simple, elegant, and requires minimal tools, making it achievable even for those with little nail art experience.
What You’ll Need for Your Pastel Easter Nails
Before starting your manicure, gather all the supplies needed to make the process smooth and enjoyable.
Tools and Supplies
- Nail Clippers and File: For shaping your nails to your desired length and style.
- Cuticle Pusher or Stick: To clean up the nail bed and ensure a neat foundation.
- Base Coat: To protect your natural nails and ensure the polish adheres smoothly.
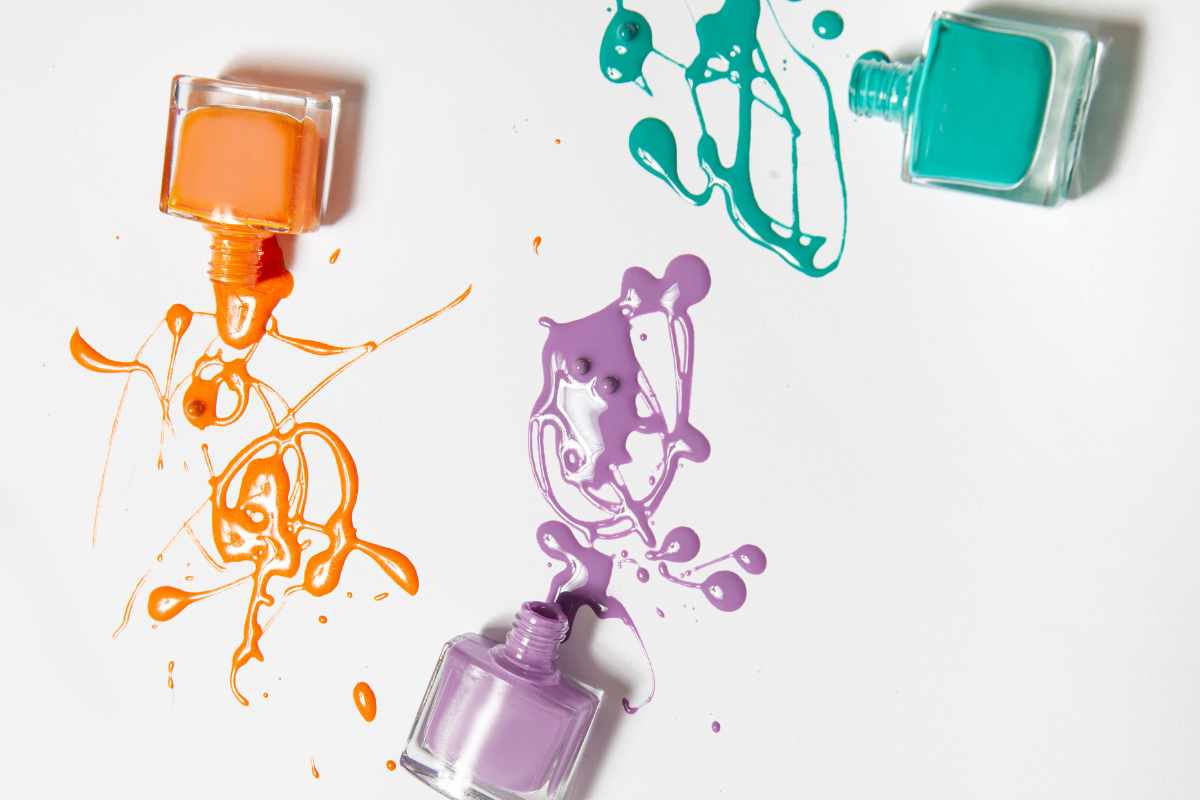
- Pastel Nail Polishes: You’ll need pastel shades like pink, blue, green, yellow, and purple.
- Topcoat: To seal your design and give it a glossy finish.
- Small Brush or Cotton Swabs: For cleaning up edges and perfecting the polish.
Preparing Your Nails
Before applying any polish, it’s important to prepare your nails. A clean and smooth surface will ensure your pastel Easter nails look polished and professional.
Steps to Prep Your Nails
Start by removing any old polish with a gentle nail polish remover. Clip and file your nails to your desired shape—square, round, or almond shapes all work beautifully with this design.
Gently push back your cuticles using a cuticle stick or pusher to create a clean nail bed. This step helps the polish adhere evenly and makes your nails look neater overall.
Finally, wash your hands to remove any dust or oils, and apply a thin layer of base coat to protect your nails and create a smooth foundation.
Applying the Pastel Colors
The beauty of this design lies in its simplicity. Each nail is painted in a different pastel shade, creating a fun and colorful look that’s perfect for Easter.
Tips for a Smooth Application
Choose five pastel colors that complement each other—pink, blue, green, yellow, and purple are classic choices. Paint each nail a different color for a vibrant yet balanced design.
Apply two thin coats of polish to each nail, letting each layer dry completely before applying the next. This ensures an even and opaque finish without streaks or smudges.
If you accidentally get polish on your skin, use a small brush or cotton swab dipped in nail polish remover to clean up the edges.
Adding a Glossy Topcoat
Once your pastel polish is dry, apply a high-quality topcoat to seal your design and add a glossy finish. A topcoat not only enhances the shine but also protects your nails from chipping and extends the life of your manicure.
Customizing Your Pastel Easter Nails
While this tutorial focuses on a simple pastel look, there are plenty of ways to customize your nails and add a touch of personality.
Adding Nail Art
- Polka Dots: Use a dotting tool or toothpick to create white polka dots on one or more nails for a playful, Easter egg-inspired design.
- Stripes: Paint thin horizontal or vertical stripes in complementary pastel shades for a more detailed look.
- Floral Patterns: Add tiny flowers using a small brush or dotting tool to enhance the springtime vibe.
Incorporating Glitter
Add a layer of glitter topcoat for extra sparkle. You can also create a glitter gradient by applying the glitter polish to the tips of your nails and blending it downward.
Maintaining Your Easter Nails
To keep your pastel Easter nails looking fresh and vibrant throughout the week, follow a few simple maintenance tips:
- Moisturize Regularly: Use hand lotion and cuticle oil daily to keep your nails and skin hydrated.
- Avoid Harsh Chemicals: Wear gloves when cleaning or using strong chemicals to prevent chipping.
- Reapply Topcoat: Add a new layer of topcoat every few days to maintain the shine and durability of your manicure.
Why This Design Is Perfect for Beginners
This pastel Easter nail design is ideal for beginners because it requires no special tools or advanced techniques. The focus is on achieving clean, even coats of pastel polish, which is simple enough for anyone to master.
The versatility of the design also allows for endless customization. Whether you prefer a minimalist look or want to experiment with additional details, pastel Easter nails provide a fun and creative way to celebrate the season.

Bringing the Spring Spirit to Your Nails
Pastel Easter nails are more than just a fun holiday accessory—they’re a way to embrace the freshness and joy of spring. The soft colors and simple design make them suitable for any occasion, from casual outings to Easter brunch.
By following this guide, you’ll have all the tips and techniques you need to create a beautiful pastel manicure that’s sure to impress. Plus, the process of painting your nails can be a relaxing and enjoyable way to express your creativity.
Final Thoughts
Creating pastel Easter nails at home is a fun and rewarding way to celebrate the season. This beginner-friendly tutorial ensures that anyone can achieve a polished and festive look, regardless of their skill level.
With just a few tools, pastel polishes, and a little bit of patience, you’ll have a stunning manicure that captures the essence of spring and Easter.
Whether you stick to the simple design or customize it with additional details, your nails are sure to turn heads and spread seasonal cheer.
So grab your favorite pastel shades, set aside some time, and enjoy the process of creating your own pastel Easter nail art. With this fresh and cheerful design, your nails will be a reflection of the beauty and joy that spring brings.
Did you find this post useful or inspiring? Save THIS PIN to your Beauty Board on Pinterest! 😊

You may also like